Django OAuth Toolkit and Ember Simple Auth

Getting proper authenticated users into your app is always one of the most tedious but essential aspects of getting your project up and running, with this post I hope to take some of the mystery and complexity out of setting up these two projects on a modern EmberJS 4.X stack.

What is OAuth2?

The OAuth 2.0 authorization framework enables a third-party application to obtain limited access to an HTTP service, either on behalf of a resource owner by orchestrating an approval interaction between the resource owner and the HTTP service, or by allowing the third-party application to obtain access on its own behalf. This specification replaces and obsoletes the OAuth 1.0 protocol described in RFC 5849.

Source: tools.ietf.org

OAuth 2 isn’t a framework like Django or Ember, OAuth2 is a set of standards or rules on how authorization and authentication should be done.

Django-oauth-toolkit

django-oauth-toolkit provides all the endpoints, data and logic needed to add OAuth2 capabilities to a Python Django project.

The quick start to getting it setup in Django:

  • poetry add django-oauth-toolkit
  • modify your settings.py
    • INSTALLED_APPS = ( ... 'oauth2_provider', )
    • REST_FRAMEWORK = {
    • 'DEFAULT_AUTHENTICATION_CLASSES': ( 'oauth2_provider.contrib.rest_framework.OAuth2Authentication', ), 'DEFAULT_PERMISSION_CLASSES': (
    • 'rest_framework.permissions.IsAuthenticated', ) }
  • in urls.py
    • urlpatters = [ ..., url(r'^auth/', include('oauth2_provider.urls', namespace='oauth2_provider')), ]
  • the update your project migratons python manage.py migrate

Now if you try and call on of the api’s in your project you should see a 401 response.

Now to create credentials

if you go to your Django Admin pages (usually /adming) you should now see a section for “Django OAuth Toolkit”. You now want to add a new Application

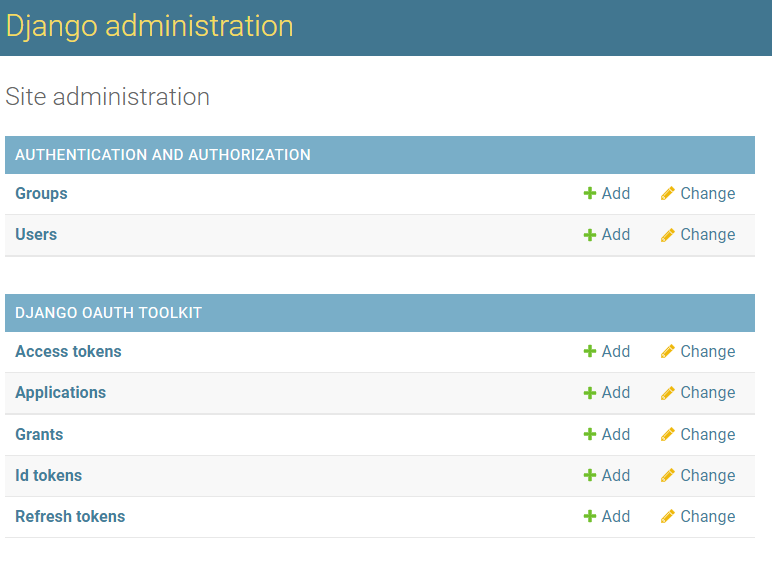
On the add Application form, you will want to copy your client ID and your Client Secret and save it for later. Other settings

User: Usually your administer user you’ve already setup in django

Client Type: Confidential

Authorization Grant Type: Resource Owner password-based

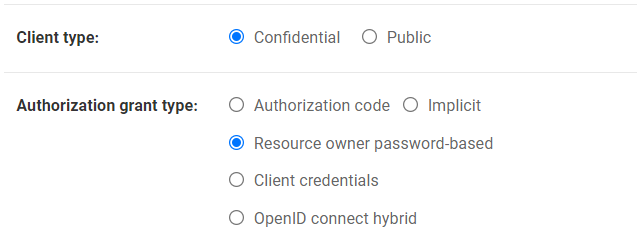
Press save and we can now get a valid acces token that we can use to authenticate ourselves.

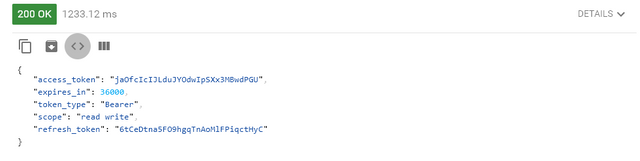
Using a tool like curl you can generate a new token using the following command:

$ curl -X POST -d "grant_type=password&username=<user_name>&password=<password>&scope=read" -u"<client_id>:<client_secret>" http://localhost:8000/auth/token/

and if that worked you should see a response similar to the one below

Now to connect this to our frontend.

Ember-simple-auth

to add ember simple auth to your project just run ember install ember-simple-auth

and now you need to configure it.

from the command line run ember g authenticator django-oauth2 and this will generate the blueprint for your main authentication against django.

open authenticators/django-oauth2.js and add the following:

import OAuth2PasswordGrantAuthenticator from 'ember-simple-auth/authenticators/oauth2-password-grant';
import config from '../config/environment';

/**
 * Authenticator specifically for Django oAuthToolkit
 * 
 **/
export default class DjangoOAuth2Authenticator extends OAuth2PasswordGrantAuthenticator {
  serverTokenEndpoint = `${config.apiHost}/auth/token/`;
  
}

I make a habit of storing my urls in Environment.js but config.apiHost would just point to your local django server.

Now you need to add a login form, i usually create a component called login.js that I can add to any route:

<div class="login-component">
  <form class="login-form" {{on "submit" (action "authenticate")}}>
    <fieldset>
      <div >
        <label for="identification">Username</label>
        <Input id='identification' placeholder="Enter Username" @value={{this.username}} />
      </div>
      <div >
        <label for="password">Password</label>
        <Input type='password' id='password' placeholder="Enter Password" @value={{this.password}} />
      </div>
      <div >
        <button type="submit">Login</button>
        {{#if this.errorMessage}}
          <p>{{this.errorMessage}}</p>
        {{/if}}
      </div>
    </fieldset>
  </form>
</div>
{{yield}}


and in the javascript file:

import Component from '@glimmer/component';
import { inject as service } from '@ember/service';
import { action } from '@ember/object';
import { tracked } from '@glimmer/tracking';
import config from '../config/environment';

export default class LoginComponent extends Component {
@tracked errorMessage;
@tracked username;
@tracked password;
@service session;

@action
async authenticate(e) {
e.preventDefault();
let headers = {
Authorization:
'Basic ' +
btoa(
config.oauth2.providers.djangoOAuth2.clientId +
':' +
config.oauth2.providers.djangoOAuth2.clientSecret
),
};

this.session
.authenticate(
'authenticator:oauth2',
this.username,
this.password,
null,
headers
)
.then(() => {
alert('Success!');
})
.catch((err) => {
this.errorMessage = err;
});
}
}

and here I am using the client ID and Secret from Django stored in environment.js

Now if you run this and log in with your django user you should see the Success alert!

And that’s it, ember-simple-auth tracks your logged in session over multiple browser windows, if you want to restrict access to a route in your application use the session to check the status of the session in the beforeModel hook in your router

// app/routes/authenticated.js
import Route from '@ember/routing/route';
import { inject as service } from '@ember/service';

export default class AuthenticatedRoute extends Route {
  @service session;

  beforeModel(transition) {
    this.session.requireAuthentication(transition, 'login');
  }
}

Some usefull links:

Setting up a basic Python Django project with Poetry and Docker compose

I’ve been using Poetry a few times on some of my sample projects for managing my python dependancies and I must say I am a big fan of it. Maybe it’s just the Javascript developer seeing the similarities to npm but with the ability to manage and create your python dependancies in such an easy and straight forward manner I will continue to use it.

Pair it with docker and you have an easy to create and replicable development environment.

Defining the Docker Compose components

  1. Create an empty project directory
  2. Create a new file called Dockerfile in this directory
    • the Dockerfile defines an applications container setup and commands that configure the virtual image.
  3. Add the following to your Dockerfile
FROM python:3.10-alpine
ENV PYTHONUNBUFFERED=1
RUN apk update && apk upgrade
RUN apk add --no-cache --virtual .build-deps \
ca-certificates gcc postgresql-dev linux-headers musl-dev \
libffi-dev jpeg-dev zlib-dev
WORKDIR /usr/src/app
COPY poetry.lock pyproject.toml /usr/src/app/
RUN pip3 install poetry
RUN poetry config virtualenvs.create false
RUN poetry install -n --no-ansi

this docker files selects a python 3 image based on alpine linux.

the apk lines ensure the linux libraries are up to date and the needed dependancies are installed for django

the last 4 lines configure poetry in your Docker container. the last two lines configure poetry to run against the global python environment, since we are running in a self contained Docker environment this is fine, but not recommened on a local poetry install.

4. Configure Docker Compose

Create a docker-compose.yml file in the root of your project directory

version: "3.9"
   
services:
  app_db:
    image: postgres
    volumes:
      - ./data/db:/var/lib/postgresql/data
    environment:
      - POSTGRES_DB=postgres
      - POSTGRES_USER=postgres
      - POSTGRES_PASSWORD=postgres
  app_django:
    build: .
    working_dir: /usr/src/app
    tty: true
    volumes:
      - .:/usr/src/app
    ports:
      - "8800:8800"
    environment:
      - POSTGRES_NAME=postgres
      - POSTGRES_USER=postgres
      - POSTGRES_PASSWORD=postgres
    depends_on:
      - app_db

this will create a database docker container and an application docker container. It will map your local source container to your current directory.

now open up a terminal in your project directory and run the following

docker-compose build

docker compose up -d

now to initialize the project you can run the following

docker compose exec app_django bash

and this will open a bash terminal in your django container

Now initialize the project

poetry new –name AppName

This will create a directory AppSrc with the package AppName

Configuring Django

from the same docker container run

poetry add django && poetry add psycopg2

this will add the django dependencies to your python environement

Now to initialize the django application

django-admin startproject mysite

and this will create a mysite directory, if there’s any issues creating the project you can use the following django docs to troubleshoot: https://docs.djangoproject.com/en/4.0/intro/tutorial01/

and now you should be able to run python manage.py runserver and see your django server running.

you can now exit out of the docker container

Running in PyCharm

to debug this from pycharm, all you need to do is setup you python interpreter (file->setting->project->python interpreter) to use docker-compose, just make sure you choose the service that matches your app_django docker compose container name

Then add a new debug configuration for a Django project

Host: 0.0.0.0

Port: 8800

Python Interpreter: Same one you configured above

Env Variables: app_django.setttings (path to your django settings file in your project directory)

hit ok, and attempt to run the project and you should now have a django server running on localhost:8800

Connecting an Ember App To An OAuth2 Python Flask Server

This article is going to go over some of the basics of connecting your Ember Octane based app to an OAuth2 Flask server (which we created in the last article ). This is a fairly straight forward and quick process with the help of a few plugins that make the whole flow much simpler.

The main piece of the puzzle is Ember Simple Auth. It’s a lightweight session management tool which will take care of automatically managing and renewing your tokens in the background and eliminates a massive amount of boilerplate code on new projects.

To get started either create a new ember app or edit an existing one.

First step is to install ember simple auth with ember-cli

ember install ember-simple-auth

This will add a session service to your project that you can query for the current state of the user. This will let create a simple login component for the user to enter their username and password

<div class="login-form container">
<!-- hide everything if we're already authenticated, you could put a welcome message instead-->
  {{#unless this.session.isAuthenticated}}
    {{#if this.errorMessage}}
      <div class="error">Error: {{this.errorMessage}}</div>
    {{/if}}
    <form class="col s12">
        <div class="row">
          <div class="input-field col s4 offset-s4">
            <Input id="email" type="email" class="validate" @value={{this.username}}/>
            <label for="email">E-mail</label>
          </div>
        </div>
        <div class="row">
          <div class="input-field col s4 offset-s4">
            <Input id="password" type="text" class="validate" @value={{this.password}}/>
            <label for="password">Password</label>
          </div>
        </div>
      </form>
      <button type="button" class="login-btn btn" {{on "click" this.login}} role="button">
         <span>Login</span></button>
    </div>
  {{/unless}}
</div>
{{yield}}
import Component from '@glimmer/component';
import { inject as service } from '@ember/service';
import { action } from '@ember/object';
import { tracked } from '@glimmer/tracking';

export default class LoginComponent extends Component {
  @service session;
  @service router;
  @tracked errorMessage = '';
  @tracked username;
  @tracked password;

  @action
  async login() {
    try {
      await this.session.authenticate('authenticator:custom-oauth2', 'password', this.username, this.password);
    } catch(error) {
      this.errorMessage = error.error || error;
    }
   //if we are authenticated navigate back to the homepage
    if (this.session.isAuthenticated) {
      this.router.transitionTo('index');
    }
  }
  @action
  async invalidateSession() {
    this.session.invalidate();
  }
}

The next piece that needs added for ember-simple-auth is a custom authenticator, this is the piece that tells ember-simple-auth how to connect and authenticate with your authentication server. These usually don’t contain more than just your server details. Using our example from the last article, that would look something like this :

ember g authenticator custom-oauth2
import ENV from "my-app/config/environment";
import OAuth2PasswordGrant from 'ember-simple-auth/authenticators/oauth2-password-grant';
import { inject as service } from '@ember/service';
const PASSWORD_GRANT = "password";

export default class CustomAuthenticator extends OAuth2PasswordGrant {
  @service session;
  serverTokenEndpoint = ENV.TOKEN_ENDPOINT;
  clientId = ENV.CLIENT_ID;
  serverTokenRevocationEndpoint = ENV.REVOKE_TOKEN_ENDPOINT;

  async authenticate(provider, username, password, scope = [], headers = {}) {
    if(provider=== PASSWORD_GRANT) {
      return super.authenticate(username, password, scope, headers);
    } 
}

Now we could make this simpler and just use the default authenticate method, but there’s a few advantages to defining a custom authenticate function that we’ll go over in detail in the next article.

If you are having issues with the server accepting your username and password, the best place to debug is to set a breakpoint in your server code here :

@oauth_bp.route('/oauth/authorize', methods=['GET', 'POST'])
def authorize():
    user = current_user()
    if request.method == 'GET':
        try:
            grant = authorization.validate_consent_request(end_user=user)
        except OAuth2Error as error:
            return error.error
        return render_template('authorize.html', user=user, grant=grant)
    if not user and 'username' in request.form:
        email = request.form.get('username')
        user = User.query.filter_by(email=email).first()
    
    return authorization.create_authorization_response(grant_user=user)

You should be able to step through the authlib code and find out where it is failing, in my experiance it’s usually in one of two places, either the client configuration is missing the needed grant type, or the user’s password is not being validated correctly. Double check the config settings stored for your client id in your database, and make sure they match your settings in the authenticator! Also check what’s being posted to the server from the browsers network tab, and compare it to your client settings in the backend database.

The ENV variables are just the settings for talking to your authenitcation server, and in my case look something like the following. I personally like to use ember-cli-dotenv to store my variables which makes it easy to have different setting for each test environment

CLIENT_ID=CUSTOM_CLIENT_ID_CREATED_IN_FLASK
TOKEN_ENDPOINT=https://localhost:5000/oauth/token
REVOKE_TOKEN_ENDPOINT=https://localhost:5000/oauth/revoke

So the final step is how do you us this to secure your pages? There’s a ember-simple-auth mixin that does all the heavy lifting, that you can use like the following in your route classes.

import Route from '@ember/routing/route';
import { inject as service } from '@ember/service';
import AuthenticatedRouteMixin from 'ember-simple-auth/mixins/authenticated-route-mixin';

export default class ListUsersRoute extends Route.extend(AuthenticatedRouteMixin, {}) {
  @service store;
  model() {
    return this.store.findAll('user')
  }
}

This will only allow authenticated users to access this route, all others will be redirected to the default page assigned in ember-simple-auth which is the /login route.

Using ember-simple-auth to access your Rest server

This is also trivial with ember-simple-auth

generate you application adapter if you don’t already have one

ember g adapter application

and add the following:

import JSONAPIAdapter from '@ember-data/adapter/json-api';
import DataAdapterMixin from 'ember-simple-auth/mixins/data-adapter-mixin';
import { computed } from '@ember/object';

export default class ApplicationAdapter extends JSONAPIAdapter.extend(DataAdapterMixin) {
  host = ENV.API_HOST + ':' + ENV.API_PORT;
  namespace = 'api';
  @computed('session.data.authenticated.access_token')
  get headers() {
    let headers = {};
    if (this.session.isAuthenticated) {
      // OAuth 2
      headers['Authorization'] = `Bearer ${this.session.data.authenticated.access_token}`;
    }

    return headers;
  }
}

and that it, now every ember data request will automatically add your session token to the request headers, flask will parse out that token and validate your access before processing the request.

Hopefully this was helpfull, Ember-simple-auth is usually one of the first add-ons I install in a new Ember project as it really makes these interactions easy without a whole lot of code to write. In the next article we’ll take this code and extend it to allow you to login with Facebook or Google.

Using OAuth2 with Flask-REST-JSONAPI

This is hopefully the first in a series of posts about adding oauth2 support to a basic web project using Flask and Ember. In the next few weeks there should be follow up articles on adding oauth2 support to Ember to talk to our backend server, as well as how to add Google and Facebook authentiction.

Authentication is confusing at the best of times, there’s so many terms and definitions that you tend to learn and use once while configuring authentication then you never think of them again. This post will help go over some of the basics of setting up a base Authentication program for your application and use a few common libraries to do so.

Authlib is a flexible OAuth library for Python. It is a very flexible framework that can be adapted to work in a variety of situations. I’ve been using Flask-REST-JSONAPI lately as I tend to use EmberJS for my frontend work and it’s support for the JSONAPI standard works seamlessly with Ember-data.

OAuth2 enables a third-party application to obtain limited access to a http service. The basic workflow for OAuth2 is as follows: 

  • The Client sends login identifiers to an authorization server
  • The authorization Server verifies the clients identity and returns a token to the client
  • The client sends the token to the resources server when requesting a resource
  • The resource server verifies the validity of the token, and if valid returns the resource to the client

Authorization servers may support several grant types. A grant type defines a way of how the authorization server will verify the request and issue the token.

Common Grant types are:

  • Authorization Code Grant – The client has a code that they can exchange for a token
  • Password Grant – The client has a username / password they can exchange for a token
  • Refresh Token Grant – The Client has a token that can be exchanged for an auth token

Authorization servers can require that Clients verify themselves before they can request a token on behalf of a user. A Client must provide it’s client information to obtain an access token.

Methods to do this are the following:

  • None – public client and no client secret
  • Client Secret – a code given to a client used to verify its self

For this example, I relied heavily on this documentation https://docs.authlib.org/en/latest/flask/2/index.html#flask-oauth2-server

First of all we need to create the models needed for our Authentication server, Authlib provides several base classes that simplifies the work needed to create tables and models for your server

import time
from flask_sqlalchemy import SQLAlchemy

db = SQLAlchemy()

from authlib.integrations.sqla_oauth2 import (
   OAuth2ClientMixin,
   OAuth2AuthorizationCodeMixin,
   OAuth2TokenMixin,
)

class OAuth2Client(db.Model, OAuth2ClientMixin):
   __tablename__ = 'oauth2_client'

   id = db.Column(db.Integer, primary_key=True)
   user_id = db.Column(
       db.Integer, db.ForeignKey('user.id', ondelete='CASCADE'))
   user = db.relationship('User')

This represents a client in our system. This will create a table to store the client secret issued to your clients, as well as metadata specific to the client.

The metadata is stored as a JSON Field that stores the following information

  • Client_name
  • Client URI
  • Grant types
  • Redirect uris
  • Response types
  • Scope
  • token_endpoint_auth_method
class OAuth2Client(db.Model, OAuth2ClientMixin):
   __tablename__ = 'oauth2_client'

   id = db.Column(db.Integer, primary_key=True)
   user_id = db.Column(
       db.Integer, db.ForeignKey('user.id', ondelete='CASCADE'))
   user = db.relationship('User')

This will store the tokens issued to the users in your system. It stores the client they authenticated with, the token itself, scopes, issued and expiry dates, and a reference to the user it’s associated with.

class OAuth2Token(db.Model, OAuth2TokenMixin):
   __tablename__ = 'oauth2_token'

   id = db.Column(db.Integer, primary_key=True)
   user_id = db.Column(
       db.Integer, db.ForeignKey('user.id', ondelete='CASCADE'))
   user = db.relationship('User')

   def is_refresh_token_active(self):
       if self.revoked:
           return False
       expires_at = self.issued_at + self.expires_in * 2
       return expires_at >= time.time()

Our user class we will keep really simple, but for this authentication we are going to use email as the username instead of a custom username field. You will also notice we’re using passlib to verify a sha256 password hash on the user’s password

from passlib.hash import sha256_crypt

class User(db.Model):
   id = db.Column(db.Integer, primary_key=True)
   first_name = db.Column(db.String)
   last_name = db.Column(db.String)
   email = db.Column(db.String)
   password = db.Column(db.String)

   def get_user_id(self):
       return self.id

   def check_password(self, password):
      return sha256_crypt.verify(self.password, password)

Next we need to add support for how the authentication server will validate a simple password grant from a client.

from authlib.oauth2.rfc6749 import grants

class PasswordGrant(grants.ResourceOwnerPasswordCredentialsGrant):
   TOKEN_ENDPOINT_AUTH_METHODS = [
       'none', 'client_secret_basic', 'client_secret_post'
   ]
   def authenticate_user(self, email, password):
       user = User.query.filter_by(email=email).first()
       if user is not None and user.check_password(password):
           return user
from authlib.integrations.flask_oauth2 import AuthorizationServer, ResourceProtector

from authlib.oauth2 import OAuth2Error


query_client = create_query_client_func(db.session, OAuth2Client)
save_token = create_save_token_func(db.session, OAuth2Token)
authorization = AuthorizationServer(
   query_client=query_client,
   save_token=save_token,
)

def config_oauth(app):

   authorization.init_app(app)
   authorization.register_grant(PasswordGrant)
   
   # support revocation
   revocation_cls = create_revocation_endpoint(db.session, OAuth2Token)
   authorization.register_endpoint(revocation_cls)
  bearer_cls = create_bearer_token_validator(db.session, OAuth2Token)


@oauth_bp.route('/oauth/authorize', methods=['GET', 'POST'])
def authorize():
   user = current_user()
   if request.method == 'GET':
       try:
           grant = authorization.validate_consent_request(end_user=user)
       except OAuth2Error as error:
           return error.error
       return render_template('authorize.html', user=user, grant=grant)
   if not user and 'username' in request.form:
       email = request.form.get('username')
       user = User.query.filter_by(email=email).first()
   return authorization.create_authorization_response(grant_user=user)

@oauth_bp.route('/oauth/token', methods=['POST'])
def issue_token():
   return authorization.create_token_response(request)


@oauth_bp.route('/oauth/revoke', methods=['POST'])
def revoke_token():
   return authorization.create_endpoint_response('revocation')

@oauth_bp.route('/api/me')
@require_oauth(‘ALL’)
def api_me(**kwargs):
   user = kwargs['current_user']
   return jsonify(id=user.id, email=user.email)

The TOKEN_ENDPOINT_AUTH_METHODS define how it will verify your client before doing the username / password check.

The authenticate_user function is called when the Authentication server has a username password combination to look up. These are passed by the client in form post data to be verified.

Here we do a simple query in our database to find the user that corresponds to an email, and verifies their password is correct. We then return the user object back to the auth server request.

Next we need to initialize the auth server and configure it’s routes:

from authlib.integrations.flask_oauth2 import AuthorizationServer, ResourceProtector

from authlib.oauth2 import OAuth2Error


query_client = create_query_client_func(db.session, OAuth2Client)
save_token = create_save_token_func(db.session, OAuth2Token)
authorization = AuthorizationServer(
   query_client=query_client,
   save_token=save_token,
)

def config_oauth(app):

   authorization.init_app(app)
   authorization.register_grant(PasswordGrant)
   
   # support revocation
   revocation_cls = create_revocation_endpoint(db.session, OAuth2Token)
   authorization.register_endpoint(revocation_cls)
  bearer_cls = create_bearer_token_validator(db.session, OAuth2Token)


@oauth_bp.route('/oauth/authorize', methods=['GET', 'POST'])
def authorize():
   user = current_user()
   if request.method == 'GET':
       try:
           grant = authorization.validate_consent_request(end_user=user)
       except OAuth2Error as error:
           return error.error
       return render_template('authorize.html', user=user, grant=grant)
   if not user and 'username' in request.form:
       email = request.form.get('username')
       user = User.query.filter_by(email=email).first()
   return authorization.create_authorization_response(grant_user=user)

@oauth_bp.route('/oauth/token', methods=['POST'])
def issue_token():
   return authorization.create_token_response(request)


@oauth_bp.route('/oauth/revoke', methods=['POST'])
def revoke_token():
   return authorization.create_endpoint_response('revocation')

@oauth_bp.route('/api/me')
@login_required
def api_me(**kwargs):
  """ And finally here is a route to test that auth is working"""
   user = kwargs['current_user']
   return jsonify(id=user.id, email=user.email)

So now if you make a request to /oauth/authorize with the user login details in a form post

Then the endpoint will return you a valid token. You can then set this token in your header to request resources on your server (using the @login_required )

The login_required is a simple wrapper that does the following to verify your token, it simply looks for the provided token in the database and if valid allows the endpoint to execute:

import json
from functools import wraps

from flask import request, make_response

from flask_rest_jsonapi.errors import jsonapi_errors
from flask_rest_jsonapi.utils import JSONEncoder


def login_required(func):
   """Check that the user is logged in and has access
   :param callable func: the function to decorate
   :return callable: the wrapped function
   """
   @wraps(func)
   def wrapper(*args, **kwargs):
       if not 'Authorization' in request.headers:
           error = json.dumps(jsonapi_errors([{'source': '',
                                               'detail': 'A user must be logged in to view this resource',
                                               'title': 'No Authorization Header',
                                               'status': '403'}]), cls=JSONEncoder)
           return make_response(error, 403, {'Content-Type': 'application/vnd.api+json'})
       token_string = request.headers['Authorization'][7:]
       token = OAuth2Token.query.filter_by(access_token=token_string).first()
       if not token or token.revoked:
           error = json.dumps(jsonapi_errors([{'source': '',
                                               'detail': 'A user must be logged in to view this resource',
                                               'title': 'Invalid Authorization Token',
                                               'status': '403'}]), cls=JSONEncoder)
           return make_response(error, 403, {'Content-Type': 'application/vnd.api+json'})

       return func(*args, **dict(kwargs, current_user=token.user))
   return wrapper

Then in your request header you would add:

Authorization : Bearer TOKEN_GOES_HERE

And when you make the request to /api/me , It will return you your current users id and email.

Software By Richard Lives again

After putting it of for way to long, I’ve finally recreated my Blog in wordpress. I decided against migrating my old blog over from Drupal to WordPress since most of the posts there are around Flex and Flash, which in this day and age is really, really outdated.

Hoping I can talk about a variety of topics but current things on my list of things:

  • libgdx development
  • Java development
  • Modern Javascript (and especially EmberJS)
  • Python Development
  • and probably a few things around some of my other hobbies.

Look forward to having you here!